Using the Navigator
The Navigator (Figure 19), that is available in all LibreOffice modules, provides tools and methods to move quickly through a spreadsheet and find specific items. The Navigator categorizes and groups spreadsheet objects which you can click on to move quickly to that object. If an indicator (plus sign or triangle, dependent on computer setup) appears next to a category, at least one object in this category exists. To open a category and see the list of items, click on the indicator.
When a category is showing the list of objects in it, double-click on an object to jump directly to that object location in the spreadsheet.
Objects are much easier to find if you have given them recognizable names when creating them, instead of using the LibreOffice default names, such as Sheet1, Table1, Table2, and so on. Note that the default names may not correspond to the actual position of the object in the spreadsheet.
The Navigator in each of the individual LibreOffice modules has a different range of functions and these functions are further explained in the appropriate user guides for each LibreOffice module.
To open the Navigator, do one of the following:
Click the Navigator icon
 on the Sidebar to open the Navigator section.
Press the F5 key to open the Navigator dialog.
Go to View > Navigator on the main menu bar to open the Navigator dialog.
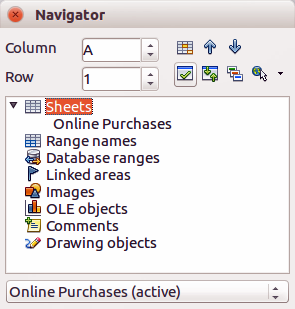
Figure 19: Navigator dialog in Calc
- Double-click the sheet number at the left end of the Status Bar to open the Navigator dialog.
The controls and tools available in the Navigator are as follows:
Column – enter the column letter and press the Enter key to reposition the cell cursor to the specified column in the same row.
Row – enter a row number and press the Enter key to reposition the cell cursor to the specified row in the same column.
Data Range
 – specifies the current data range denoted by the position of the cell cursor.
Start
 – moves to the cell at the beginning of the current data range, which you can highlight using the Data Range icon.
End
 – moves to the cell at the end of the current data range, which you can highlight using the Data Range icon.
Contents
 – allows you to show or hide the contents.
Toggle
 – toggles the content view. Only the selected Navigator element and its subelements are displayed. Click the icon again to restore all elements for viewing.
Scenarios
 – displays all available scenarios. Double-click a name to apply that scenario and the result is shown in the sheet. If the Navigator displays scenarios, you can access the following commands when you right-click a scenario entry:
Delete – deletes the selected scenario.
Properties – opens the Edit scenario dialog, where you can edit the scenario properties.
Drag Mode
 – opens a submenu for selecting the drag mode. You decide which action is performed when dragging and dropping an object from the Navigator into a document. Depending on the mode you select, the icon indicates whether a hyperlink, link or a copy is created.
Insert as Hyperlink – inserts a hyperlink when you drag-and-drop an object from the Navigator into a document. You can later click the created hyperlink to set the cursor and the view to the respective object. If you insert a hyperlink that links to an open document, you need to save the document before you can use the hyperlink.
Insert as Link – creates a link when you drag-and-drop an object from the Navigator into a document.
Insert as Copy – generates a copy when you drag-and-drop an object from the Navigator into a document.
Tip
Ranges, scenarios, pictures, and other objects are much easier to find if you have given them informative names when creating them, instead of keeping the default Calc names, for example Graphics 1, Graphics 2, Object 1, and so on. These default names may not correspond to the position of the object in the document.